Sunday, August 27, 2017

Low Tech Eclipse 2017 Images

I made it home with my eclipse safety glasses just before the moon's shadow started to eat away at the sun. I had in my mind to try a couple of different low tech ways of watching the solar eclipse as well. My colander's holes seemed to be too big. (However, from what I have learned since, don't give up on something until at least 60% coverage. The holes were big enough that you did not see any difference using them as a pinhole camera at the early stages of the eclipse but then neither did the tree leaves. The pattern from the colander might have been pretty cool at our 75% maximum coverage like the tree leaf solar crescents we got later during the eclipse.) The two sheets of cardboard, one with a pinhole were cumbersome. The best quick pinhole camera that I threw together was made from a shoe box.

I cut out a quadrilateral a couple of inches across, from one end of a shoe box with a hinged lid. I stretched and taped a piece of aluminum foil over the opening. I used a safety pin to poke a hole in the aluminum foil. I pointed the hole at the eclipse and the image was projected on the inside of the other end of the shoe box. I propped the shoe box up on the patio so that the long axis of the box was aligned with the incoming sun rays and took a picture of the projection with my camera. As you can see we were already pretty well into the eclipse by the time I took my first picture of the image produced by my pinhole camera. I had been watching the progress of the moon's shadow with my eclipse glasses while experimenting with the projection methods. The first bite out of the sun was at about 12 o'clock and the shadow progressed pretty much towards 6 o'clock until our maximum coverage.

I kept thinking about what a shame it was that my colander, with its pattern of holes, had not shown the early stages of the eclipse so I decided to add more holes to my shoe box camera and experimented with the size of the holes too. The middle hole of the middle row of the rest of my pinhole camera projection pictures was my original hole. The most crisp images were formed with the smallest holes that I made with a needle. The closer to maximum coverage, the crisper the images became. The bigger holes blurred out more as the moon's shadow retreated and eventually disappeared off the left edge of the sun as seen from my vantage point.

We were lucky not to have had a cloud in the sky. As the solar eclipse progressed you could sense the light being a bit dimmer outside. At maximum coverage from inside the house it was quite a bit darker than normal. It was so dark that it seemed like a big storm should be about to hit. It was a strange sensation for it to be that dark inside with a completely clear sky outside at one in the afternoon.

I hope you had the opportunity to safely view the eclipse. I am looking forward to the total eclipse in 2024. We will be in the path of totality for that one. We will also be in the path of an annular eclipse the previous October with 80% of the sun obscured.

Click on the image of the sun crescents to enlarge.

Saturday, August 19, 2017

Design This - Volunteer of the Year Swag

Many years ago, the Tarrant County United Way had an annual volunteer dinner at which it recognized a range of volunteerism, including a recipient from each city in Tarrant County who nominated a Volunteer of the Year. Dalworthington Gardens participated in that program from the time I was aware of it in the 90's until it was discontinued. Last year the Dalworthington Gardens Historical Committee decided to bring back awarding an annual Volunteer of the Year recipient locally.

Nominations were called for and the Historical Committee voted to award the 2016 Volunteer of the Year to James Harris for his years of facilitating a movie in Gardens Park during the summer. Former Alderwoman, Velma Bogart introduced James at a City Council meeting and Mayor Kimberly Fitzpatrick read the proclamation.

Initially the committee was considering giving the Volunteer of the Year recipients a plaque in addition to the signed proclamation, however several members wanted to give a more useful item commemorating their volunteerism to the recipients. Several ideas were bounced around and finally the idea of a keychain or necklace was chosen. I came up with a simple design (a one inch bezel does not give a lot of room for something complex) and mocked up a sample for the committee to see. They liked it, I made one up for James and the chair of the committee took it to him recently. Even though the remainder of his award was delayed, it was well received and I have secured supplies for several years going forward so that future recipients can be recognized and receive all their swag at the same time.

Nominations for the 2017 Dalworthington Gardens Volunteer of the Year will be available at the Neighborhood Night Out on October 3 in Gardens Park.

Saturday, August 12, 2017

Heavy Lifting - Raising a Large Landscape Rock

I wish I had thought of taking before and during pictures, you will just have to use your imagination as I describe the project my husband and I tackled this morning. The pictures in this post were taken later in the evening after it rained.

We have a large landscape rock in a garden bed at the intersection of our driveway and sidewalk. We had built a bit of a mound before we had the rock yard deliver and place the rock in the garden because of the slope down from the concrete. Sometime after the rock was placed, we used a similar technique as we did today to add a little more fill under it. Possibly in part from the fill settling or just because the garden wall we had built would cause the base of the bed to be higher, I figured out last week that the rock would need to be raised another 3 - 4 inches, in place preferably because I liked its location and orientation. Did I mention it was a big rock?

This was much more than a "Honey would you move the couch over a couple of inches?" request but my husband was game to help me. I had a plan and set out to get everything in place. My car would need to be the anchor for the come along and a nylon strap ratchet wrapped around the rock. I strategically placed the car in the yard and attached the come along to my trailer hitch bumper. I then wrapped the nylon strap around the rock twice and adjusted it so that both hooks would bear the same tension when attached to the other end of the come along. Now it was time to see if I had lined everything up correctly so that the base of the rock nearest the sidewalk would lift instead of the rock being dragged forward. Hopefully when lifted the rock would be stable enough for my husband to add some encouragement if the rock tried to rotate or tip to the side. I cranked on the come along, the attachments tightened and a very small indication of movement appeared. We paused. The rock was still stable. We got out the large pry bars to help ensure that the far side of the base would lift instead of having the whole rock slide forward. With my husband on the pry bar and myself on the come along we achieved the movement we wanted. After lifting the end of the rock up a bit higher than I would eventually need it, I placed and packed a mixture of paver sand and decomposed granite under the raised base of the rock. Thankfully I had managed to nail the direction of forces through the center of mass so that the rock was very stable and no encouragement was needed to keep it from tilting side to side under tension. After packing the material for the raised pad we released the tension on the come along and still had a stable rock. So far so good.

Now we had to move the car onto the driveway and repeat the process from the other side. Luckily the pack job was sufficient that when we winched up the opposite end of the base of the rock, the closest end of the base did not dig in and crush the newly created mound. I did not nail the center of mass and force application quite as perfectly as the first time but it was good enough that my husband was able to apply enough encouragement to keep it from rotating around a vertical axis like it started to. Once I packed more material under the raised end, the rock became stable under tension and still was when we released it.

Physics is fabulous. By using a few simple machines to help us multiply our force several times we were able to safely accomplish our goal of lifting our very large rock in place by 3 - 4 inches so we could install more fill to maintain it at that height. After completing this part of the task I spread chips to level out the surface of the garden bed around the rock.

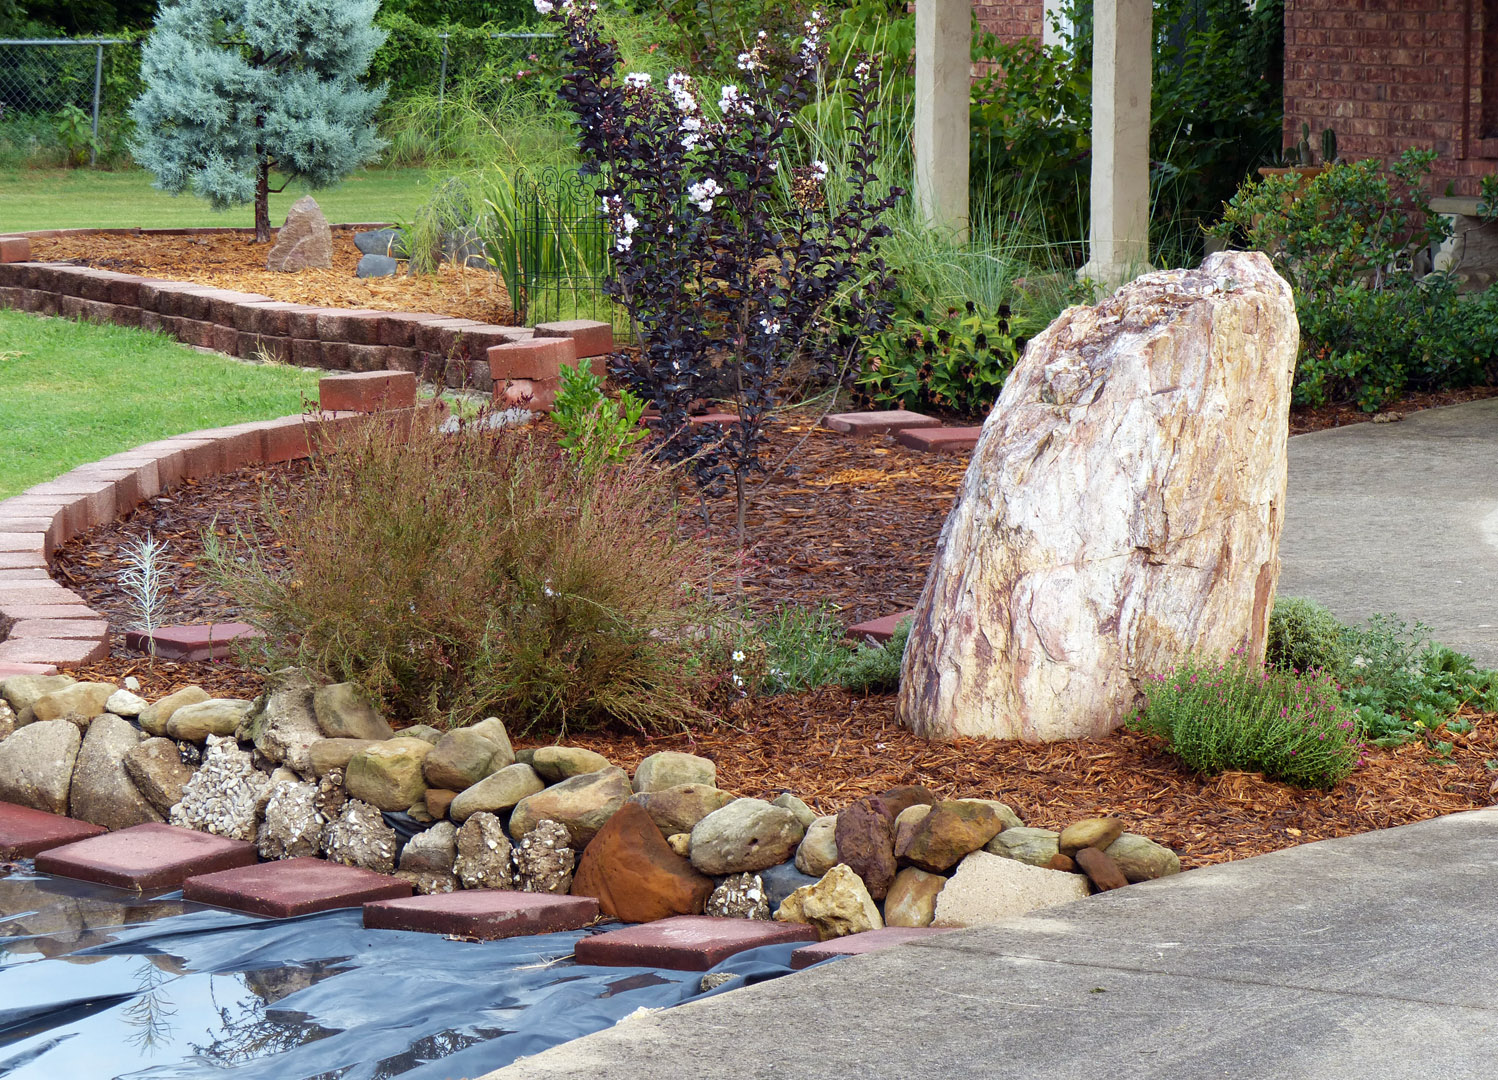
What led me to wanting to raise my rock? Earlier this week I realized that my silver ironweed I had planted near the newly reset Pavestone wall would need to be raised because I needed to add a full paver height of mulch on that side of the garden and that would be too much for this drought tolerant plant. (It is the gray plant to the left in the second picture and the right in the third one in this post. Click on the images to enlarge.) After lifting my plant I realized I should raise the current edge of my planting bed next to the walkway on the black plastic (second picture) so that the chips were level from the Pavestone wall to the driveway. It became apparent that I would have to bury part of the rock in chips if I leveled out the rest of the bed in that location so the rock had to be raised.

I am so glad that we tackled this portion of the project this morning. With the rain we received today I would not have been able to drive my car through the yard and the bed would probably have been too wet as well. I still have four or five plants seen in the last photo that I will need to lift up before adding more chips. However, that will wait until late fall or winter because those plants have been in place longer than the silver ironweed had been. Transplanting will be easier on the plants in cooler weather.

Wednesday, August 2, 2017

Blue Jays Mob and Imitate Hawks

I'm guessing an experienced birder can probably tell the difference between a blue jay's imitation of a hawk call and an actual hawk call. I'm not sure I'm there yet but I have observed a blue jay imitating a hawk and have gotten pretty accurate, based on where a call is originating from, deciding if the hawk call I am hearing is real or imitation. I used to go in search of the hawk I was hearing and wonder why I could not find such a big bird in the direction of the call. One day I finally saw a blue jay making the call when I zeroed in on the sound. I knew blue jays were one of the birds that would pester, or mob hawks, but until then I did not realize they also impersonated them.

I have read a few thoughts as to why they do this, such as alerting other birds to an actual hawk danger or scaring off other birds. I have not been able to tell exactly what my blue jay impersonators are trying to accomplish. I have heard several of them go into extreme blue jay alarm call, but not a hawk imitation, when there has been a small hawk around. I found this example of a clever blue jay doing a hawk call to scare off other birds, thus reducing competition at the bird feeder.

While I have seen a half a dozen or more blue jays sounding the alarm and mobbing a hawk perched in a tree in my pasture, I have also noted a single blue jay making an alarm call and mobbing a hawk as seen in my photographic art images of this post (click to enlarge). The hawk seems mighty calm or even unimpressed at the antics of the blue jay. These images were taken in early May so it is possible that the red-shouldered hawk perched on the light pole was too close to the blue jay's nest for comfort. Or perhaps some blue jays just enjoy picking on the raptors and getting away with it.